If you are reading this, you're probably not a working professional photographer. Furthermore, you are fairly new to digital and perhaps to photography in general. You might have just graduated from photography school. You use your camera on Auto most of the time, with perhaps an occasional foray into Aperture and Shutter Priority. The camera's instruction manual states that one of the capture settings is RAW and maybe you tried it once, only to discover that you couldn't open the images on your computer. If so, this article is for you.
What is the RAW image format anyway? Essentially it's what your camera's sensor records without any of the usual in-camera processing associated with JPEG capture. RAW is often referred to as the "digital negative" but that's true only in a very general sense. Unlike a color negative, RAW only records luminance values for each pixel, so it's really a grayscale file. It includes color information (and metadata, which is info about your camera and its settings) but it needs to be interpreted and that's where the RAW converter comes in. A RAW file is nothing you could see as an image. In a way, it's just a potential image waiting to be "developed" but like a negative it does require a fair amount of post-capture processing.
So why bother? There are a number of reasons, a couple of which apply especially to point-and-shoot cameras. First of all, a RAW file records everything your sensor captured. That gives you more to work with. JPEG always entails some loss of information as part of the compression process and this often causes problems later if you try to edit a JPEG file. RAW is also "high bit". That means you have a much larger array of colors available and that fact provides you with more flexibility when doing color corrections. By the way, if you want to instigate a heated argument amongst digital photographers, just take a position on 8-bit versus 16-bit files. Then duck. It's a controversial topic that seems to generate strong opinions. I lean toward the high-bit position but I'm not married to it. If you need a JPEG file, those are 8-bit by definition. And I believe most consumer inkjet printers convert 16-bit files to 8-bit in the printer driver if you haven't already done so yourself.
The big advantage of the RAW image format is that it enables you to make adjustments to your image without introducing any of the dreaded "artifacts" common to JPEG'S. With the latter, you are trying to correct an image that has already been "corrected". In a word, you have real CONTROL over what your image will look like. White balance off? Easy to fix in RAW. Need to adjust the exposure? Fine, fix it (at least up to a point). But I mentioned some things specific to point-and-shoot cameras and here they are:.
One, noise in the image. You know what that looks like. If you don't, just set your camera at its highest ISO setting (even if that's only 400) and take a picture. Digital SLR's handle this pretty well; point-and-shoots not so well. The 8MP models are notorious when it comes to noise. Yes, you could buy a separate noise reduction program like Neat Image but many RAW converters give you tools to reduce both kinds of noise, luminance and color, before the image is "developed".
Two, sharpening artifacts. Perhaps you've seen those little halos around some edges within your photo. That's because point-and-shoot cameras typically have the sharpness setting too high. You can turn that down if your camera model offers such a feature but if you shoot RAW you can bypass in-camera sharpening altogether. You then have much more control over sharpening in post-capture, especially if your image editor is Photoshop.
Three, loss of detail. JPEG compression throws away some of the information your sensor captured and that's the nature of the beast. But with point-and-shoot cameras you have a further culprit — overly aggressive noise reduction. I'm not talking about the user-activated NR when shooting at slow shutter speeds. I'm referring to the built-in noise reduction that's associated with all image processing, especially with high-ISO images. The result is softness and loss of detail. You normally have no control over this. But when you use the RAW image format you are able to determine exactly how much noise reduction you want. Or, to put it another way, how much loss of detail you can accept. This is important because noise and detail are related.
Ok, let's look at some examples. Here are a few RAW images captured with two Olympus point-and-shoot cameras — the C5050 and the C8080. (By the way, neither of these models is manufactured any longer though they were introduced fairly recently. Point-and-shoot cameras seem to have production runs that last about as long as some Hollywood marriages.)
For my converter I am going to employ Adobe's "big gun", Photoshop CS2, but you don't have to invest in a $600 piece of software to take advantage of RAW capture. Photoshop Elements will work almost as well and is vastly cheaper. For that matter you could use whatever your camera manufacturer supplies or even one of the freebies out there like IrfanView. They won't be as feature-rich as CS2 but they'll get you started. Don't let a tight budget keep you from shooting RAW.

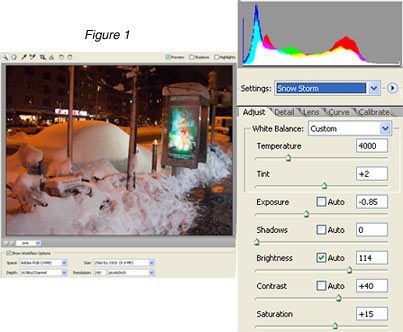
Figure-1 shows what you see when you open a RAW file in CS2. This is the main or Adjust tab with settings for White Balance, Temperature, Tint, Exposure, Shadows, Brightness, Contrast, and Saturation. You'll make most of your changes here. Elements 4 looks very similar and any other RAW converter worthy of the name should give you the same options though the names and format may be a little different. For this image I lowered the Temperature slightly and increased the Exposure, Contrast, and Saturation above the Camera Default setting (you can also check the Auto boxes and sometimes that works pretty well). Normally I would deal with contrast with a Curves Adjustment Layer in Photoshop (the CS2 converter does have a Curves tab). However, I'm assuming that most people reading this are unfamiliar with Curves so for simplicity sake I used the Contrast slider.
Note the single peak on the far left of the histogram. This indicates "clipped" shadows in the blue channel, meaning there is some loss of detail there. It may be possible to recover some of that detail since it only affects one channel but I consider the loss to be minor so I'm skipping over that. Anyway, I don't want to introduce unnecessary complexity at this point and scare anyone off.
The CS2 converter lets you reduce the two basic kinds of noise, luminance and color, and I adjusted both of these. You can adjust the Sharpness under this tab (Detail) too but I prefer to do that in Photoshop itself. There's also a Lens tab for fixing chromatic aberration and a Calibrate tab for adjusting specific colors. Some cameras may routinely impart a particular color cast to all the images and the Calibrate tab is the place to fix that. However, color casts in a single image are best dealt with elsewhere.
This image, by the way, contained mixed light sources — fluorescents, halogen or sodium street lights, and probably other types. All are illuminating different parts of the image and imparting its own color cast but you can't select a particular part to adjust in the RAW converter. That would have to be done in Photoshop so what you see here is a compromise, color-wise.
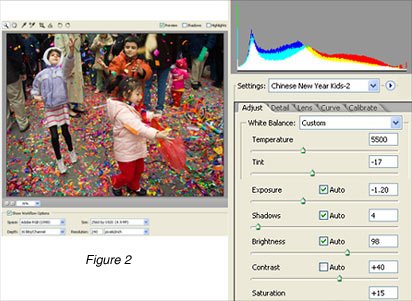
Figure-2 shows a scene from the Chinese New Year celebration in New York. The sky was overcast so I increased the Temperature to 5500 to eliminate most of the blue color cast. The Auto settings for Exposure, Shadows, and Brightness worked ok but again I increased both the Contrast and the Saturation in order to make the colors pop. If I wanted to recover lost detail in the dark clothing, I would have used different settings. But I preferred to focus attention here on the children's faces and the colorful paper in the air and on the ground so I let those dark areas go. Noise reduction was as in the previous image.
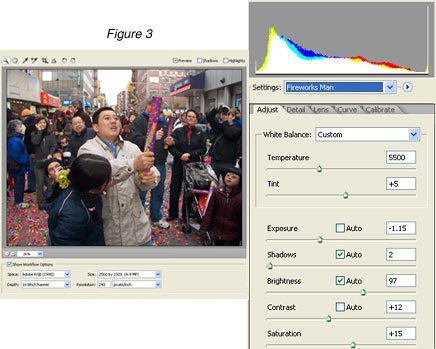
Figure-3 shows the same event on the same day. Again, I adjusted the Temperature but I had to be careful with the Exposure and Contrast settings so as not to blow the detail in the dark clothing, which I considered more important here than in Figure-2. Note the single peak on the far right side of the histogram. It's white, indicating "clipped" highlights in all three color channels. It represents the sky and the reflections on a couple of windows in the background. No detail there and nothing to recover. I could improve that in Photoshop itself (perhaps by cloning in some cloud detail from another image) but not here. Incidentally, if you hold down the ALT key (Option key if you are on a MAC) while moving the Exposure and Shadow sliders, you can see how far you can adjust those before significant clipping occurs.
The above images were shot with the Olympus C5050, ISO 400, and Aperture Priority set at f/1.8. But here's some cropped images taken with the Olympus C8080, an 8 megapixel point-and-shoot, and I'm including both the converted RAW image format files as well as the JPEG captures for comparison. ISO setting was 100 and I rarely go above that with this camera.
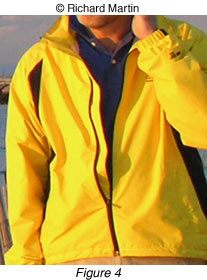
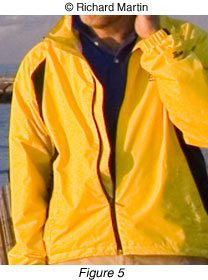
Figure-4 shows the JPEG and the main problems here are the slight green cast to the jacket and the loss of detail in the fabric. Figure-5 is the converted RAW file after corrections in the converter. I moved the Tint slider to the right to eliminate the green while increasing the Temperature somewhat. Figure-5 shows more detail, even after some noise reduction, and retains more of the jacket's texture and sheen (this was also converted to JPEG for the Web. The RAW file itself showed more detail than you see here). The JPEG capture, on the other hand, sort of smeared that detail.
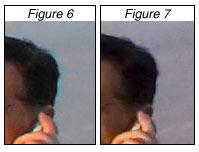
Figure-6 illustrates what I was talking about earlier regarding sharpening in JPEG's. Notice the halo to the right of the man's head and the lack of any such artifact in the converted RAW image in Figure-7, even after sharpening in Photoshop with Unsharp Mask.
Perhaps I should mention that I set my color space to Adobe RGB (1998), even though neither camera offers that as a setting. One of the great things about the RAW image format is that you can choose the color space in the RAW converter and Adobe RGB (1998) is the preferred choice. However, the illustrations in this article were changed to sRGB for the Web.
So after opening the converted RAW images, I can just send them directly to the printer, right? Well, not exactly. What I have illustrated is essentially a "quick and dirty" procedure for handling RAW. It's enough to get you started but the true power of RAW is somewhat greater than the simple approach I have demonstrated here. Also, all of these images will require additional work in Photoshop itself. For that, I would keep them at 16 bit as long as possible (some selection tools are not available in 16 bit but there's more support for that than in earlier versions of Photoshop). At the end of the post-capture process, my habit is to save the image as an uncompressed TIF or PSD (the latter if there are Layers and I want to retain them) but of course I keep the original RAW file too.
Should you always shoot RAW? Well, no. RAW is slower than JPEG capture and that can present difficulties when photographing action, especially with a point-and-shoot camera. Of course, shooting action with any point-and-shoot is often an exercise in frustration because of the shutter lag and slow write times. You might want to save RAW for things like portraits and scenic-type subjects.
Let me add some final words of advice. You've heard admonishments about backing up your work and you are going to hear it again here. Save your original RAW files in more than one place. I routinely back up ALL my image files (RAW, TIF, and PSD) on two different computers, plus two CD's. Periodically, I archive these files on DVD's too and I check all the disks at least once a year in order to determine if they can still be read. But I also make prints of my "keepers" on acid-free paper and long-lasting pigment inks.
Keep in mind that the RAW image format is a proprietary format unique for each camera. There's no guarantee that the manufacturer will continue to support that particular format in the future or that the manufacturer will even exist. If that's a concern, you might want to look into Adobe DNG, a publicly documented format and the closest thing to a true archival tool that we currently have. But that's a topic for another time.


