In Part One I discussed the dynamic range of various media and how their characteristics limit our ability to fully capture high-contrast subjects. In this article I am going to talk about a popular tool to deal with this. It's commonly referred to as HDR (it stands for high dynamic range in case you haven't figured that out) and it has received a lot of interest lately. Here, I'll discuss one of the more popular stand-alone programs, Photomatix. However, I am going to use the separate Tone Mapping plug-in with Photoshop CS2, rather than the full version of Photomatix.
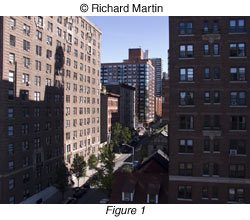
First, we need some differently exposed images of the same subject. The easiest way to capture those is to use the auto bracket feature that's available on most digital cameras. My subject is a rather ordinary urban scene but one with a high contrast range and Figure-1 shows the shot with the exposure based on the midtones and highlights. While there is some detail visible in the shadows, it's pretty dark and unappealing. The camera was not a DSLR but even with the latter, the contrast would exceed what the sensor can realistically capture.
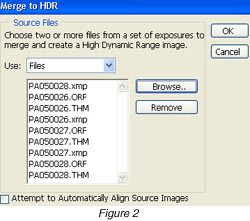
So on to HDR. For this example, I used three images of this scene, with the exposures one stop apart. My camera offers several bracket choices but one stop seemed best for this illustration. Figure-2 shows the HDR Source dialog, accessed by clicking on File, then Automate, then Merge to HDR in CS2. You can then select the files you want to use by clicking on Browse and finding them on your hard drive or you can open the files in Photoshop and select OPEN FILES. The ones you see here are Olympus RAW (ORF) with their associated "sidecar" files, XMP which contains the metadata and THM, a JPEG thumbnail. It's my practice to keep the original file names but when I save the RAW images as PSD or TIF files, I change the name to something more meaningful than what you see here.
Click on OK and that opens up the main Merge to HDR window (Figure-3). On the left you can see the three bracketed images with the exposure compensation settings in the camera as EV values. The large image in the center is the HDR preview. On the right is a histogram with a slider tool below it. You can use the slider to set the white point but I'm not going to do that here. Instead, I simply click OK.
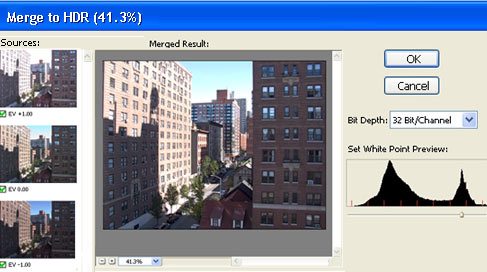
What happens next is the three images are merged into a 32 bit file. How long that takes depends on how large the files are and how much computer memory is available for this. I then open this file in the Photomatix Tone Mapping tool, accessed via the Filter menu in Photoshop (Filter/Photomatix/Tone Mapping). But before I do that, I need to change the 32 Bit Preview Options so that they read 0 for exposure and 1 for gamma. You'll find that under the View menu. Normally it's grayed out for the simple reason that we usually don't have 32 bit files, but now it will be visible. The result of this change will probably look a little strange and washed out. Don't worry. That will be fixed when we open the image in the Photomatix Tone Mapping tool (Figure-4).
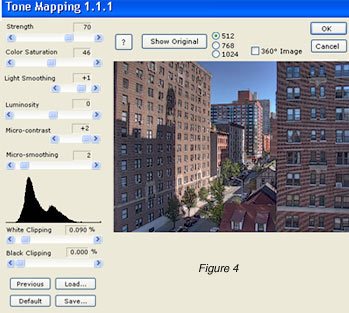
Now the image looks much better and you can see there are a lot of controls here. The most important ones, arguably, are those that adjust the white and black points. A handy histogram aids you while doing this. One of the nice things about the Tone Mapping tool is the on-screen help it provides. Scroll your mouse over any of the adjustments and a little explanation about what it does appears down below under Note. For more extensive explanations, click on the question mark (?). A browser window then opens with lots of info. Pretty cool.
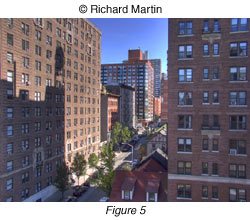
When you are finished making any adjustments, click on OK. This opens the 32 bit file in Photoshop proper. However, we need to get out of 32 bit mode because there is little we can do with such a file. Most of the adjustment options are grayed out. My practice is to convert the 32 bit file to 16 bit. This makes the tools I really want to use to "tweak" the image available – reduce the distortion caused by the camera lens, sharpen the image, and pump up the saturation somewhat. The final result is Figure-5. Not perfect but a dramatic improvement over Figure-1.
If I wanted to print this image, I would change it to an 8 bit file (all the images in this article are JPEG's and hence 8 bit by definition) since none of my printers can print a 16 bit one. I could probably skip this step, though, because I think the printer driver would make the change itself. This leads to a question about what happens to the tonal values when we convert. Yes, they are compressed somewhat but not as much as you might think. The HDR "look" is retained, as you can see.
Some might ask why I didn't use a more interesting image for this article. Well, HDR does have one important limitation. Your subject really needs to be still, with no discernable movement. This particular cityscape fits that requirement but most of my landscapes, waterscapes (I do a lot of those) and cityscapes have some movement in them, usually the result of some human or animal activity. This is deliberate on my part. Sometimes the movement is manifested by foliage in a strong wind; sometimes it's choppy water. This is not a problem with single images but with HDR we are merging several shots into one. The result can be a kind of "ghost" in the image.
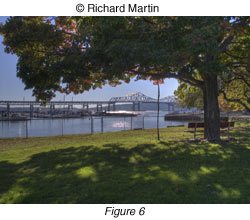
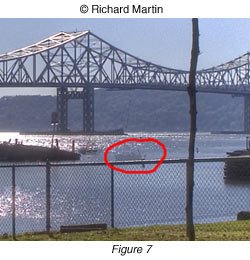
Take a look at Figure-6. This is a typical high-contrast scene in bright sunshine and the HDR procedure I outlined above produced an image with detail in both the dark shadow area under (and in) the tree as well as in the bright bridge and sky in the background. But there is a problem. It's not too noticeable in the full frame but Figure-7 is a crop of a small part of the image. There's a "ghost" boat there and it's moving. Additionally, the water to the left of the boat is also moving, resulting in a rather freaky look. Some people might think I am nitpicking but I consider this unacceptable. A fast, high-end DSLR might have done better (the bracketed exposures would have been captured much faster) but I suspect these artifacts would still be there to some degree. Not good enough as far as I'm concerned.
There's another thing to keep in mind. HDR files can be HUGE. You better have plenty of memory available or you'll spend a lot of time sitting around waiting for the computer to catch up. It's best to not have other programs open when you do this.
The bottom line with HDR is simply this. For high-contrast subjects with little or no movement – fine. For anything else, forget it. Better to use single images and adjust the contrast in Photoshop with Curves and the Shadow/Highlight tool. I do think HDR (and especially Photomatix) has its use. One possibility that comes to mind is crime scene photography. I do intend to employ it whenever feasible. But someday we will have real high dynamic range sensors right in the camera. That's the future I'm waiting for.
Learn more great photography tricks at our digital photography school.


