Inkjet Printing - The Next Step?
Regular readers of our Web site know that NYI Student Advisor Richard Martin is very serious about his photography and that he has done a lot of digital printing. A few months back, we ran his article Let's Make a Calendar. In the past few months, Richard decided to invest in a printer that can make larger digital photographic prints. After studying the matter, he decided on the Epson 2200, a model that many photographers use based on its performance and price. If you want to print digital photos, especially fine art prints, and particularly if you're using the Epson 2200, you'll find Richard's article well worth reading.
So you've taken the plunge and purchased a nice photo printer for your digital images. While you may still be struggling with the best settings,you love the fact that you can do this yourself. You are now thinking "Gee, I wish I could make prints larger than 8 1/2 x 11 inches." Or perhaps you've heard that the ink in your inkjet, being made from dyes, is not as stable as pigments. You're wondering just how long those beautiful prints you've made will last.
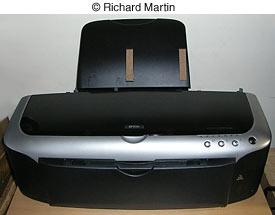
Well, I've pondered those issues too. I wanted to make larger prints for matting and framing and longevity was certainly a concern. My choice was the Epson 2200, a model that is very popular amongst serious photographers. Maximum paper size is 13 x 19 inches. It's fairly large (about 24 inches wide) and rather a heavy beast - about 26 pounds. In terms of size, it's nothing like the Epson 4000 and the other wide-format printers but still bigger and heavier than my two Epson 820 models.
The 2200 uses Epson's Ultrachrome inkset to print digital photos, which contain pigments that have a wider color gamut than the earlier Archival inks on the 2000P. The trade-off is a bit less longevity but I think the trade-off is well worthwhile. I never liked the output from the 2000P but prints from the 2200 are gorgeous.

If you like glossy prints, however, the 2200 might not be your best choice. Glossies exhibit a kind of "bronzing" effect when viewed at an angle. This is due to the different reflective characteristics of the Ultrachrome ink and the paper surface. Some might find this effect rather objectionable, others perhaps not. But personally I think a dye printer like the Epson 1280 or maybe one of the Canon models is better if you prefer glossy prints.
I bought the 2200 to make fine art prints and nothing else. My preference for that sort of thing is matte papers and my main choice is Epson Velvet, a fairly heavy acid-free paper made from 100% cotton rag. I tried to print some digital photos on Epson Premium Glossy, Semi-Glossy, and Luster papers just to see what they looked like and HATED them. Velvet has an almost museum look to it. But the surface is a little delicate, like most papers with a textured surface, so it must be handled carefully.
This printer is really optimized for matte-type surfaces and one of the reasons is the optional Matte Black cartridge, which replaces the regular Photo Black ink. Colors are really rich but the blacks are BLACK with a depth I've never seen on a matte print. This has to be seen to be fully appreciated.
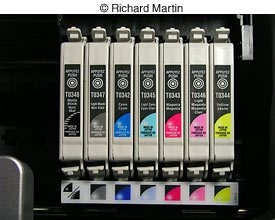
The inkset also includes Light Black. It's supposed to give you better black-and-white prints but apparently plays a role with color too. So altogether we have 7 inks: Matte or Photo Black, Light Black, Cyan, Light Cyan, Magenta, Light Magenta, and Yellow - all in individual cartridges. Much better than a single cartridge that you have to replace whenever one color runs out.
Profiles (I'll say more about profiles in a moment) are for three Epson Matte papers: Enhanced Matte (formerly known as Archival Matte), Epson Velvet, and Epson Watercolor. There are also profiles for several glossy types.
Ok, you've got your image in whatever editor you are using (I use Photoshop 7 and CS) and you are ready to sendt the file to the printer. You've decided on the file resolution (I use 360ppi for smaller prints and 300ppi for the larger ones), the printer is on, and you are about to click on Print. Don't do it yet. You still have to decide how you are going to handle that little thing we call Color Management.
From this point on I am going to discuss this in the context of Photoshop. To print digital photos you first have to decide what color space your Photoshop preferences is (or should be) set as. I use sRGB. I know, most folks recommend Adobe RGB (1998) but my workflow is sRGB throughout and it works for me. Next, click on File, then Print with Preview. The dialog window that then opens has some options. Make sure the box Show More Options is checked. Below that is a tiny window with two choices: Output and Color Management. Select Color Management. Below that is Source Space with two choices, Document and Proof Setup; Document should be checked.

Below that is Print Space and here it gets a little complicated. The first little window is called Profile and if you look at the options you will see all the individual profiles of the Epson papers the 2200 supports. These were included when you installed the software. If you are going to let Photoshop handle color management, select the appropriate profile for the paper you are using. Note that for the matte papers there are two profiles for each, one for the Photo Black cartridge and one for the Matte Black.
Below the Profile you have selected is Intent. I suggest you choose Relative Colorimetric and check the box below that is labeled Use Black Point Compensation when you want to print digital photos of the finest quality.
Now you can click on Print right in the Print with Preview window. The printer software opens, but I suggest you go to Properties before you print. This takes you into the driver settings. More fun here. Select Best Photo, Source (Sheet, Roll, or Manual), Paper Size and Orientation. Then click on Advanced. On the next window select ICM under Color Management. Under ICC Profile select No Color Adjustment.

The above procedure should work well but I must confess it did not give me the results I am used to getting with my other Epson printers. So I decided to return to my previous settings. In the Print with Preview window, I select Same as Source for the Print Space Profile. In the printer driver setting I again select Best Photo, paper type, etc. but then PhotoEnhance. Clicking on Advanced I then select either Hard or Vivid for the Tone. For Effect I choose Sharpness with the slider in the middle.
I think those profiles I mentioned earlier are used, whether you have Photoshop handle color management (you do have more options if you go that route) or whether you have the printer driver do it.
Regardless of how you deal with Color Management there are two other settings to consider. Under the Page Layout tab check Centered if you want the image to print centered on the page. I also recommend you turn off High Speed if you want a high-quality print.
For the resolution in the printer driver I recommend Photo - 1440dpi. The driver does have a setting for 2880dpi but I personally can't see the difference in print quality between the two - at least with the Epson Velvet paper. Besides, Epson states that this paper is optimized for 1440dpi.
Interface with the Epson 2200 is either USB or Firewire. There's also parallel connection available but forget that. I initially hooked mine up via one of my Firewire ports but decided to go to USB. I have a lot more of the latter than the former and am saving the Firewire connections for future devices that require them.
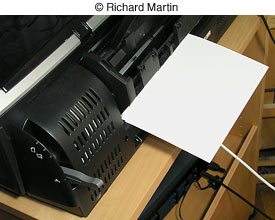
A word about the heavier fine art papers. They must be fed into the printer from the back. That's what the Manual setting in the driver refers to. The printer's written manual states that you should line up the edge of the paper with the rollers but my experience has been that you must angle it slightly in order for the borders to be even.
What about non-Epson papers to print digital photos? I have no personal experience with them but there a lot of fine-art matte type papers out there, some with profiles you can download from the manufacturer's Web site. Then too, you could always develop your own custom profiles but that's beyond me, at least at the present time.
Nor do I have a calibrated monitor. I can almost hear some people screaming in protest upon reading this but the fact is I get the colors I want and they essentially match what I see on my monitor, a Trinitron. Printing is very much a personal thing. It's an art, not science. You may have to experiment a bit to find the settings that work for you. Good luck!


